

As I’m sure any solo video maker will agree, shooting a professional-looking video of yourself when starting out can take a lot of time and practice. At first, most people believe that coming up with great content for their videos is what matters most and take the actual filming part for granted.
Whether you’re shooting for your brand-new YouTube channel, a school or university project, or an instructional video for your latest app, people generally dive in without realising how underprepared they are and inevitably come up against the same list of problems.
Here’s how it usually goes:
They work on their amazing script, they learn it off by heart and, brimming with excitement, they grab their camera to go shoot, only to encounter:
- Background noise
- Inconsistent lighting
- Boring or distracting visuals
- Inappropriate DSLR
- Bad focus and sound
- Flat or unenthusiastic delivery
- Over-filming
Then, picturing the work and effort required to solve so many problems, they just…give up.
Little do they know, that with just a bit of extra knowledge and some preparation, they can sidestep all of these growing pains and get straight to creating and publishing the content they desire. Which is exactly why we’ve put together this useful and easy to understand infographic:
I hope this infographic has helped clear up some of the difficulties you have encountered when making solo videos.
If you would like a more comprehensive breakdown of the infographic’s content, feel free to continue reading below, where I have elaborated on each of its 4 sections.
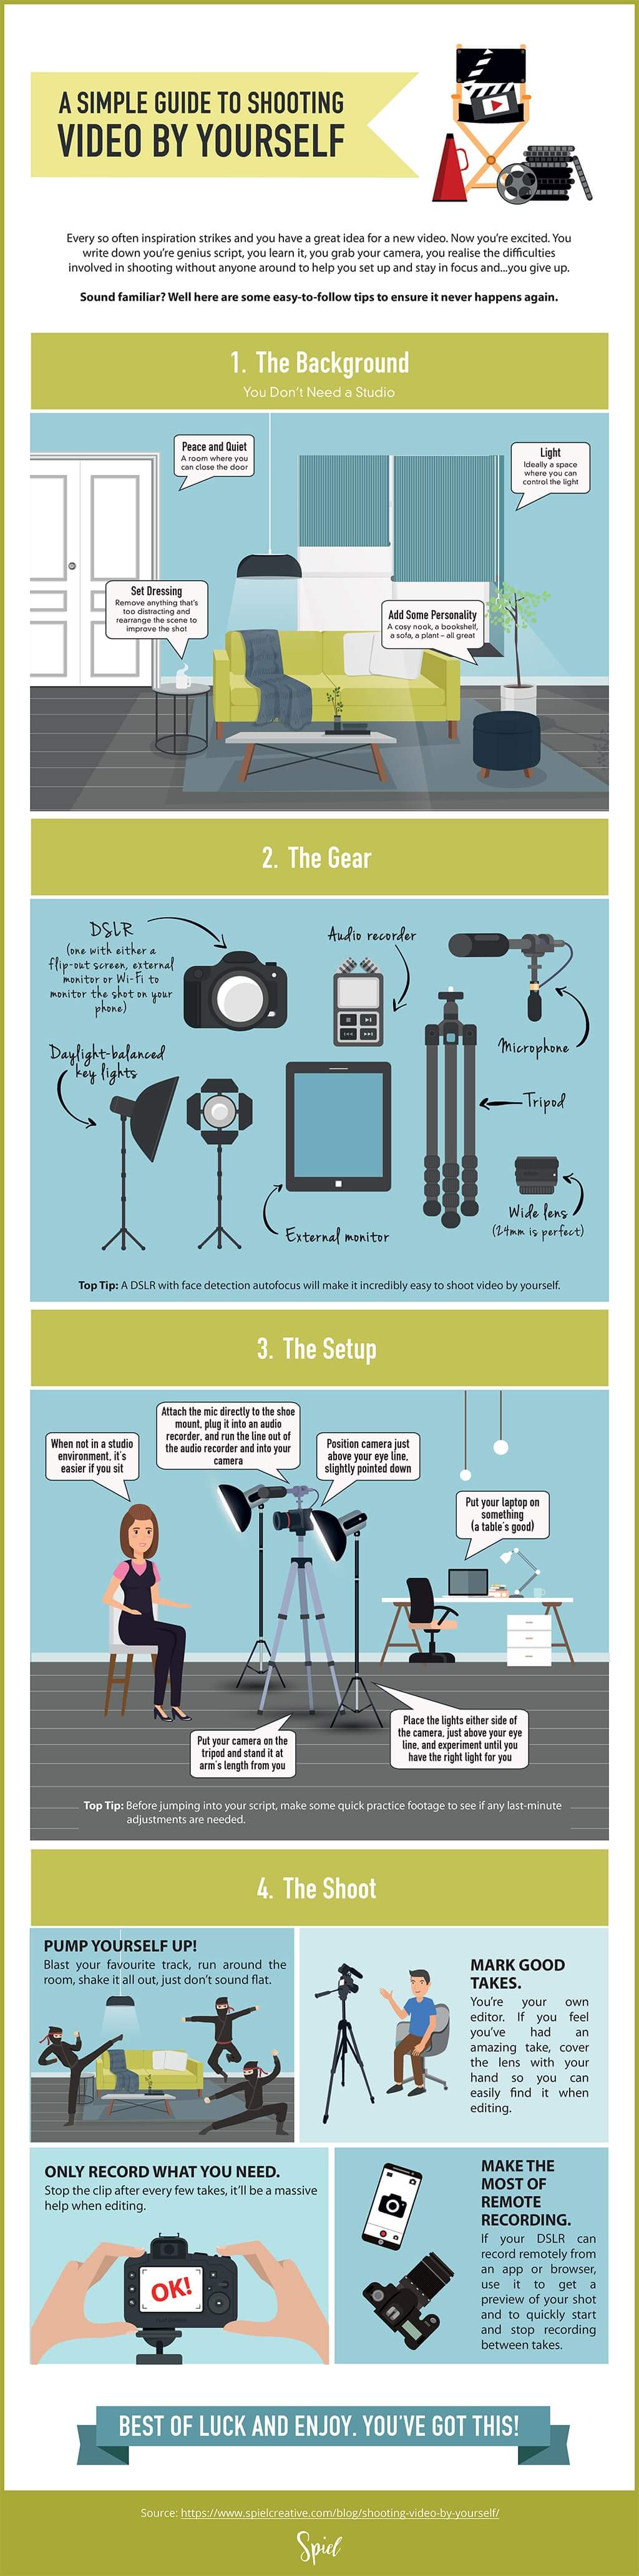
- The Background
Despite what studios will say, you don’t need one to shoot your video! In fact, having a more authentic real-world setting is often a bonus.
Here is what you need:
- Peace and quiet: A room that’s relatively isolated from noise and activity. If there’s a door, and if you can close it, that should help.
- Light: Ideally a space where you can control the light. Adjustable blinds or a dimmer switch are good – but not essential.
- Personality: Use things like books, plants or a couch to add some personality to the shot.
- Set Dressing: Remove anything that’s too distracting, like that steaming mug, for example, and rearrange the scene in whatever way you feel improves it.
- The Gear
To make filming by yourself as easy as possible, this is the gear you will need:
- DSLR: One with either a flip-out screen, external monitor or Wi-Fi to monitor the shot on your phone or laptop – just some way of seeing if the shot’s in focus. If it has face detection autofocus, all the better.
- Wide lens: 24mm is perfect.
- Tripod
- Microphone
- Audio recorder
- External monitor
- Daylight-balanced key lights
- The Setup
When filming by yourself, and not in a studio environment, it’s generally easier if you sit. That way, if necessary, you can pop your laptop on something at eye level in order to read your script.
Place your camera on the tripod and stand it at arm’s length from you. It should be positioned just above your eye line and pointing slightly down. Now, attach the mic directly to the shoe mount, plug it into an audio recorder and run the line out of the audio recorder and into your camera.
Sit your lights either side of the camera, also just above your eye line, and experiment until you have a light you’re comfortable with.
Finally, before jumping into your script, make some quick practice footage to see if any last-minute adjustments are required.
- The Shoot
You’re all set up and ready to shoot!
Here’s how to ensure it goes off without a hitch:
- Pump yourself up: Blast your favourite track, run around the room, shake it all out, just don’t sound flat.
- Mark good takes: You’re your own editor. If you feel you’ve had an amazing take, cover the lens with your hand so you can easily find it when editing.
- Only record what you need: Stop the clip after every few takes, it’ll be a massive help when editing.
- Make the most of remote recording: If your DSLR can record remotely from an app or browser, use it to get a preview of your shot andto quickly start and stop recording between takes.
- And, most importantly, have fun!
Click here to learn more about how we can help you with your video production.