

Finding the perfect location for your video shoot can feel like solving a puzzle. You want a backdrop that not only looks good but also supports the story you’re trying to tell. At the same time, lighting and sound conditions must align perfectly to avoid costly fixes later.
The location sets the tone of your video, influences how your audience feels, and can either elevate or detract from your message. But not every place that looks nice on camera will work well behind the scenes. Sometimes, beautiful locations come with hidden challenges.
This article will guide you through all the key factors to consider when picking your shoot location. You’ll learn what to prioritise, what to avoid, and how to turn any space into the perfect video backdrop.
We’ll explore everything from natural lighting and ambient noise to permits and weather. By the end, you’ll know how to spot a winner and sidestep common pitfalls.
Whether you’re a brand owner, producer, or content creator, these insights will help you plan shoots that look professional and run smoothly. So, let’s dive in and find that ideal spot for your next video.
1. Understand the Story You’re Telling
Your location should always support your story, not distract from it. Begin by clarifying the tone and message you want to convey. This foundation helps you narrow down places that truly fit your creative vision.
Think about the emotions you want to evoke. Are you aiming for excitement, trust, calmness, or energy? The setting should naturally reinforce those feelings to help your audience connect.
Consider the audience’s expectations as well. A backdrop that resonates with them can improve engagement and retention. For instance, a youthful brand might lean towards vibrant urban settings, while a luxury brand may prefer elegant interiors.
Keep in mind the story arc of your video. Is it playful, serious, or inspirational? Your location must mirror this narrative consistently to avoid jarring contrasts.
Finally, balance creative desires with practical constraints. Sometimes a perfect story-driven location is not feasible due to time or budget, so prioritise elements that matter most.
2. Choose a Backdrop that Adds Value
The backdrop is one of the first things viewers notice, so it needs to complement your subject. A cluttered or overly busy background will distract the audience from your message. Aim for simplicity with subtle textures, shapes, or colours that enhance rather than compete.
Indoor settings provide opportunities to curate the backdrop with furniture, art, or props that support the narrative. Outdoors, natural elements like trees, water, or architectural details can add visual interest and depth. Look for locations that provide layers rather than flat, boring backgrounds.
Avoid backgrounds with bright or neon colours that may cause colour bleed or make grading difficult. Instead, opt for neutral or brand-aligned palettes to keep the visual tone consistent. This helps maintain focus on your subject and key message.
Consider how your subject’s clothing and appearance will contrast with the backdrop. You don’t want them blending in or clashing harshly. Choose locations where the subject stands out and commands attention.
Remember, the backdrop should never overshadow the subject but should subtly enhance the overall frame. It’s about striking the right balance between interesting and understated.
Lastly, scout potential locations with the backdrop in mind. Take test shots or photos to visualise how the scene will translate on camera.
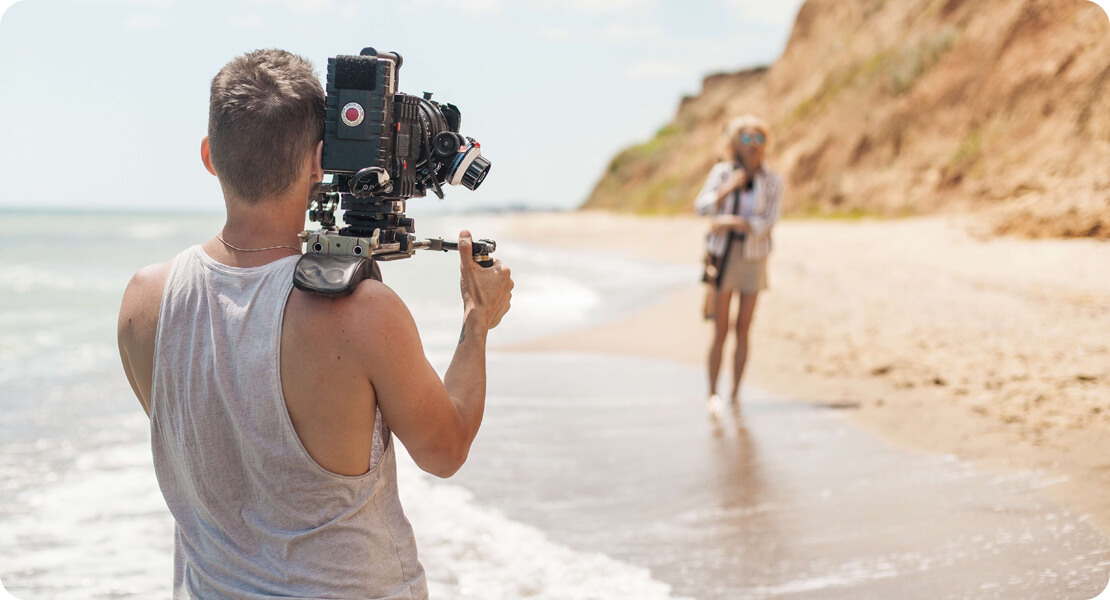
3. Prioritise Good Natural Lighting
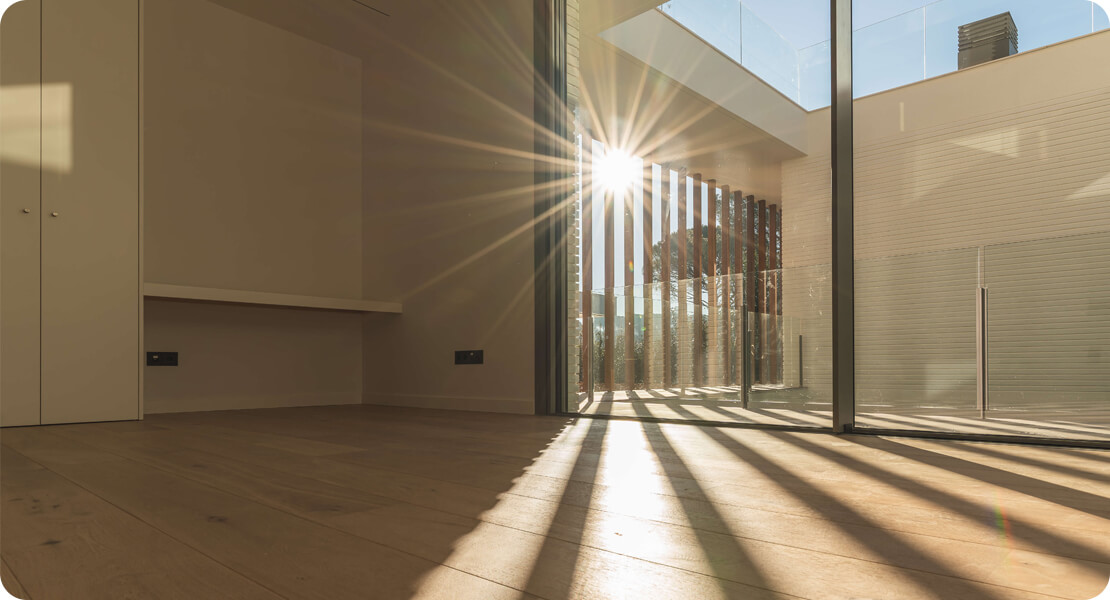
Natural light is a priceless resource for video shoots, offering soft, flattering illumination. Look for locations with large windows or open spaces where sunlight can filter gently. This creates warm, inviting skin tones and reduces harsh shadows.
The best time for natural light is during the “golden hours” — shortly after sunrise or before sunset. At these times, the light is softer and warmer, enhancing the mood and giving your video a cinematic quality. Avoid shooting under direct midday sun which can produce unflattering, harsh shadows.
Understand how light moves through your chosen location throughout the day. Visit at different times to see where shadows fall and if any areas become too dark or overexposed. This will help you plan the timing of your shoot.
If your location lacks sufficient natural light, plan for artificial lights that mimic daylight. Use softboxes, diffusers, or bounce boards to create even, natural-looking light. Harsh or uneven lighting can make your subject appear tired or unprofessional.
Keep in mind how weather can impact natural light outdoors. Cloudy days provide diffuse light but might require extra lighting gear to brighten scenes. Sunny days offer vibrant light but come with the risk of glare and shadows.
Always prepare backup lighting options. Even the best natural light can be unpredictable, so having control over your illumination is key to consistent quality.
4. Avoid Harsh Artificial Lighting
Artificial lighting is necessary for many shoots but can easily harm your video quality if handled poorly. Harsh fluorescent or overhead lights cause unwanted shadows, unflattering colours, and flickering issues on camera. Check the location’s existing lighting before committing.
Inspect the site at the intended shoot time to see if any artificial lights flicker or cast strange colour tints. Mixed lighting sources (e.g., fluorescent and tungsten) create white balance problems and require complex corrections in post-production. This adds time and cost.
If harsh lights are unavoidable, bring your own lighting equipment. Use diffusers and softboxes to soften light and eliminate sharp shadows. Colour gels help balance temperatures between different light sources.
Pay attention to the direction of artificial light. Front lighting flatters faces, while side or backlighting can create drama and depth. Adjust accordingly based on your desired effect.
Be aware that certain bulbs may buzz or hum, causing audio interference. Test audio carefully and opt for quieter lighting when possible.
Investing in quality LED lights designed for video can improve both lighting flexibility and reliability.
5. Check for Ambient Noise Levels
Good audio quality is just as important as visuals. Background noise can ruin an otherwise perfect video, distracting viewers or masking speech. Take sound seriously by checking ambient noise during a scout visit.
Listen carefully for consistent noises like traffic, air conditioning, construction, or nearby crowds. Some noises are intermittent but loud enough to cause problems during takes. Pay special attention to loud HVAC units or buzzing electrical devices.
If the location is noisy, plan your shooting schedule around quieter times. Early mornings or late evenings can sometimes be more peaceful. Alternatively, consider soundproofing options or shooting indoors to control noise better.
Bring a portable recorder or microphone to test sound levels on site. This gives you real-world data and helps plan mic placement. Use lavalier mics or shotgun microphones to isolate voices from background sounds.
If you cannot eliminate noise, prepare to fix audio issues in post-production, but be aware this can be expensive and imperfect. Prioritise finding a quiet location whenever possible.
Don’t forget to consider potential interruptions like alarms, sirens, or wildlife sounds. These can cause multiple retakes and increase shoot time.
6. Mind the Space for Equipment and Crew
A cramped location is a logistical nightmare. Ensure there’s enough room for your camera setup, lights, crew members, and talent to move freely and safely. Limited space increases the risk of accidents and slows down the production.
Consider the size and type of equipment you plan to use. Large cameras, tripods, and rigs require generous space to avoid blocking shots or crew members. Also, check for enough room to store gear when not in use without cluttering the set.
Adequate space means easier movement and less stress, leading to better energy on set. Tight quarters can make crew members uncomfortable and hinder communication.
Evaluate the availability of power outlets and internet connectivity if you require livestreaming or on-the-spot uploads. Running cables over long distances can be risky and affect quality.
Think about seating or rest areas for the team, especially during longer shoots. Comfortable conditions contribute to morale and efficiency.
Plan your layout in advance and communicate it clearly with your crew to maximise space usage and workflow.
7. Secure Necessary Permits and Permissions
Even the most stunning location isn’t worth it without the right permits. Filming in public spaces, private properties, or protected areas usually requires legal approval. Research regulations early and apply for permissions well before your shoot date.
Not having permits can lead to fines, forced shutdowns, or legal battles that derail your project. Some cities have specific filming permits with fees and restrictions, so be thorough. Always confirm what documents you need.
Private owners might require contracts specifying usage rights and liability terms. Maintain good communication and respect their conditions to foster a smooth partnership.
Keep digital and physical copies of permits on site during shooting. This avoids disputes and proves your right to film.
Consider hiring a location manager or legal consultant if you’re new to filming permits. Their expertise can save you time and headaches.
In short, permit planning is as essential as lighting or camera setup — don’t overlook it.
8. Evaluate the Location’s Accessibility
How easy is it for your team and talent to get to the location? Accessibility impacts the logistics, budget, and even the morale of your crew. Difficult or distant locations can eat into your shooting time.
Check for parking availability, especially if you have large vehicles or equipment trucks. Limited or costly parking can slow down setups and add expenses.
Public transport access is a bonus for team members without cars. It also helps if you expect talent or guests who rely on it.
Assess access points for loading and unloading gear. Narrow streets, stairs, or heavy doors can complicate equipment movement.
Think about people with disabilities and whether the location accommodates them. Inclusive planning reflects well on your brand and complies with legal standards.
Finally, consider how easily the location can be reached in case of emergencies. Proximity to medical facilities or main roads matters.
9. Watch Out for Weather and Environmental Factors

Outdoor shoots are at the mercy of weather conditions, which can make or break your video. Rain, wind, or extreme heat can damage equipment and lower production quality. Always check forecasts and have contingency plans.
Consider the typical climate for your shoot location and season. Some places experience sudden weather changes, requiring quick adaptations. Bring weatherproof gear and shelter options to protect crew and equipment.
Sun position affects lighting and shadows dramatically outdoors. Plan your shoot times around the sun’s path to maximise natural light and avoid harsh contrasts.
Humidity can cause fogging on lenses or equipment malfunctions. Prepare cleaning kits and protective covers to minimise these risks.
Environmental factors like insects or allergies can distract talent and crew. Provide repellents or first aid supplies as necessary.
Local wildlife noises may also interfere with sound. Scout locations for these conditions ahead of time.
If weather turns bad, have backup indoor locations ready to keep your schedule on track.
10. Consider Power Supply and Charging Options
Reliable power is critical for modern video shoots packed with electronic gear. Without sufficient outlets or generators, you risk running out of juice during key moments. Check the location’s power infrastructure early.
Count the number and type of outlets available. Some locations have limited or oddly placed sockets that make cable management tricky. Use extension cords and power strips rated for your equipment load.
If you’re shooting outdoors or in remote places, bring portable generators or battery packs. Make sure they are quiet enough not to interfere with sound recording.
Plan charging stations for cameras, microphones, monitors, and mobile devices. Keeping all devices powered avoids downtime.
Check whether the location allows the use of generators or if special permits are needed. Some places have noise or emission restrictions.
Have backup batteries on hand and establish a rotation schedule for recharging.
11. Think About Control Over the Environment
Locations that let you control variables like lighting, sound, and access give you a huge advantage. Outdoor public spaces or busy areas often come with unpredictable distractions.
Private venues or studios allow you to lock doors, dim lights, and silence outside noise. This control reduces retakes and speeds up production.
Choose spaces where you can set up and adjust equipment without interruptions. Crowded or noisy areas force compromises in quality.
Also consider privacy for your talent and crew. Being comfortable and undisturbed leads to better performances and teamwork.
If you can’t control everything, prepare to work around interruptions or background activities.
Secure the cooperation of nearby neighbours or building managers to minimise disruptions.
12. Analyse the Acoustics

The shape, materials, and size of a location affect how sound travels and is captured. Hard surfaces reflect sound, creating echoes, while soft surfaces absorb sound and reduce reverberation.
Rooms with many reflective surfaces like glass, tile, or concrete can cause echo and muddled audio. Carpeted or padded rooms tend to produce cleaner sound.
Large open spaces might create a hollow, distant sound. Smaller rooms with good acoustic treatment help contain audio better.
Use portable acoustic panels or blankets to control problematic reflections and noise. These can dramatically improve recorded sound quality.
Avoid locations near noisy appliances or mechanical systems that hum or buzz. Their noise is difficult to filter out.
Test audio during your location scout to identify any acoustic challenges and plan accordingly.
13. Look for Visual and Audio Privacy
Privacy is essential for uninterrupted shooting and sound capture. Locations near busy streets, schools, or events can be noisy and disruptive.
Choose places where pedestrian or vehicle traffic is limited during your shoot. This reduces unexpected interruptions or unwanted people in the frame.
Soundproof rooms or areas with thick walls help isolate your audio from outside noise. This is crucial for dialogue-heavy scenes.
If outdoors, consider using directional microphones and noise reduction tools to compensate.
Request that nearby neighbours or businesses avoid noisy activities during your shoot times.
Always have a clear agreement about access control to maintain privacy and security.
14. Plan for Set Design and Customisation
Some locations provide a blank canvas, while others come with existing décor. Assess how much you can modify the space to suit your creative needs.
Permission for painting walls, hanging props, or rearranging furniture might be required. Discuss these options upfront with property owners.
A location that supports your set design vision reduces the need for expensive post-production fixes.
Look for locations with versatile features—neutral walls, moveable furniture, or unique architectural details you can leverage.
Remember to restore the space to its original condition after the shoot to maintain good relationships.
Bringing your own design elements ensures consistency with your brand and story.
Careful planning of set design within your location makes your video visually cohesive and polished.
15. Avoid Locations with Hazardous Conditions
Safety should always be a top priority. Locations with unstable structures, slippery floors, or exposed wiring can endanger your crew and talent.
Inspect the site for hazards like loose cables, uneven surfaces, or poor lighting in walkways. Make sure emergency exits are accessible and clearly marked.
Avoid areas near heavy machinery, construction zones, or toxic substances.
If you must shoot in such places, implement strict safety protocols and have first aid ready.
Check insurance coverage for filming in risky environments.
Prioritising safe locations ensures a smooth production without accidents or liability issues.
Final Thoughts: The Right Location Can Make or Break Your Video
Choosing the right location is a critical step in delivering high-quality video content. Every detail—from lighting and sound to accessibility and permits—plays a vital role in the success of your shoot.
With careful planning and attention to these 20 factors, you can avoid common pitfalls and select a location that elevates your story, production quality, and brand identity.
Remember, time is precious, but smart preparation lets you produce exceptional videos even under tight deadlines.
You can contact us to take your video production to the next level and find the perfect location tailored to your needs. Because with the right location, your video can truly shine.